Pipelines
NOTE: Pipelines is an Early Access feature. It may change significantly as development continues.
What Pipelines Are
A Pipeline is a reusable, parameterized workflow that automates large batches of work (like simulation) on the Luminary platform. You define a pipeline once as a flow of interdependent Stages. They are parameterized so they can be invoked multiple times with different inputs. Each invocation creates a PipelineJob, which manages execution and tracks all Artifacts produced (for example geometries, meshes, and simulations).
Key concepts:
Pipeline: A set of stages and dependencies (structured as a directed acyclic graph) that describe work on the platform.
PipelineJob (or just “job”): The result of invoking a Pipeline with a table of arguments (PipelineArgs).
PipelineJobRun (or just “run”): One execution of the Pipeline for a single row in the PipelineArgs table.
Task: The execution of a single stage for a particular run.
Artifacts: Objects produced by runs, such as geometries, meshes, and simulations.
Why We Built Pipelines
Pipelines are built to automate large batches of similar work while keeping the workflow explicit, repeatable, and observable. The primary use case is large dataset generation, i.e. running hundreds to thousands of simulations including but not limited to geometry, mesh setting and/or flow condition variants.
What Pipelines Offer
Scale: Use one Pipeline definition to run thousands of variants.
Data provenance: Pipeline jobs keep track of the complete configuration used to produce each artifact.
Observability: Monitor progress and failures at the job, run, and task level.
Robustness: Jobs are long-running (from seconds to weeks) and built to tolerate transient failures and outages in the Luminary platform. Tasks are isolated and can fail independently while still capturing useful output and error information.
Control: Pause, resume, and tune concurrency per stage at the PipelineJob level.
Flexibility:
RunScriptstages allow you to run arbitrary Python snippets within the flow of a Job.
Prerequistes For Pipelines
Pipelines do not manage project and geometry setup for you. Typical end-to-end workflows still require initial setup such as:
Creating Projects.
Uploading Geometries.
Creating Simulation Templates.
Creating Named Variable Sets.
For large design sweeps, a recommended pattern is:
Upload a single parametric Geometry.
Associate geometry parameters with named variables.
Create many Named Variable Sets.
Run one PipelineJob with many runs (i.e. rows in the PipelineArgs table) to generate variants.
See Pipelines and Named Variables below for more details, or jump to the Full Example Tutorial to see this recommended pattern in practice.
How Pipelines Work
You build a Pipeline in the SDK using:
Built-in stages like
CreateGeometry,CreateMesh, andCreateSimulation.Optional custom (
RunScript) stages using the@pipelines.stagedecorator.PipelineParameters to parameterize stage configuration.
When you invoke the Pipeline, you supply a PipelineArgs table. Each row becomes a run, and each
run executes all stages, producing artifacts along the way.
See the stages reference docs for details on all built-in stages, and the RunScript stage reference docs for details and examples of how to run custom code in a pipeline.
Pipelines and Named Variables
Pipelines are tightly integrated with the Named Variables feature of the Luminary platform. When
your PipelineArgs table includes a Named Variable Set (NVS) column, you can specify a different
NVS per run, and each run will “apply” its NVS to any stages that can use Named Variables.
While defining a NVS is not a necessary requirement for any stage, it does enable additional functionality like parametric geometric variation. See stage-specific details in the stages reference docs.
Pipeline Parameters
While Named Variables are used to parameterize Luminary resources like Gemoetries and Simulation
Templates, they cannot be used to parameterize the configuration of pipelines stages. For this, we
have PipelineParameters.
For example, the CreateGeometry stage is configured with a base geometry ID. This ID can be a
hard-coded string, or it can be a StringPipelineParameter, in which case it can (and must) be set
in each row of the PipelineArgs table that you pass in when you invoke the pipeline. See
Builder Interface below for an example.
Flowable Types
Every pipeline stage has 0 or more inputs and 0 or more outputs. Inputs and outputs consume and produce specific types of objects. These are the types of objects that can flow through a pipeline, hence we call them “flowable objects” or “flowable types”.
The full set of flowable types is:
Geometry
Mesh
Simulation
SimulationTemplate
RenderImage
VisDataExtract
While the RunScript stage can specify an arbitrary number of inputs and outputs, the types of
those inputs and outputs are constrained to the flowable types, just like any other stage.
The flowable types show up in the SDK with a prefix of PipelineOutput, e.g.
PipelineOutputGeometry, which refers to the fact that they always come from stage outputs.
Monitoring And Control In The UI
Pipelines are created and invoked in the SDK, but the UI is the best place to monitor and control execution.
Typical UI usage:
View jobs and overall progress.
Drill into runs and tasks to see failures and error messages.
Inspect artifacts produced by each run.
Pause and resume jobs.
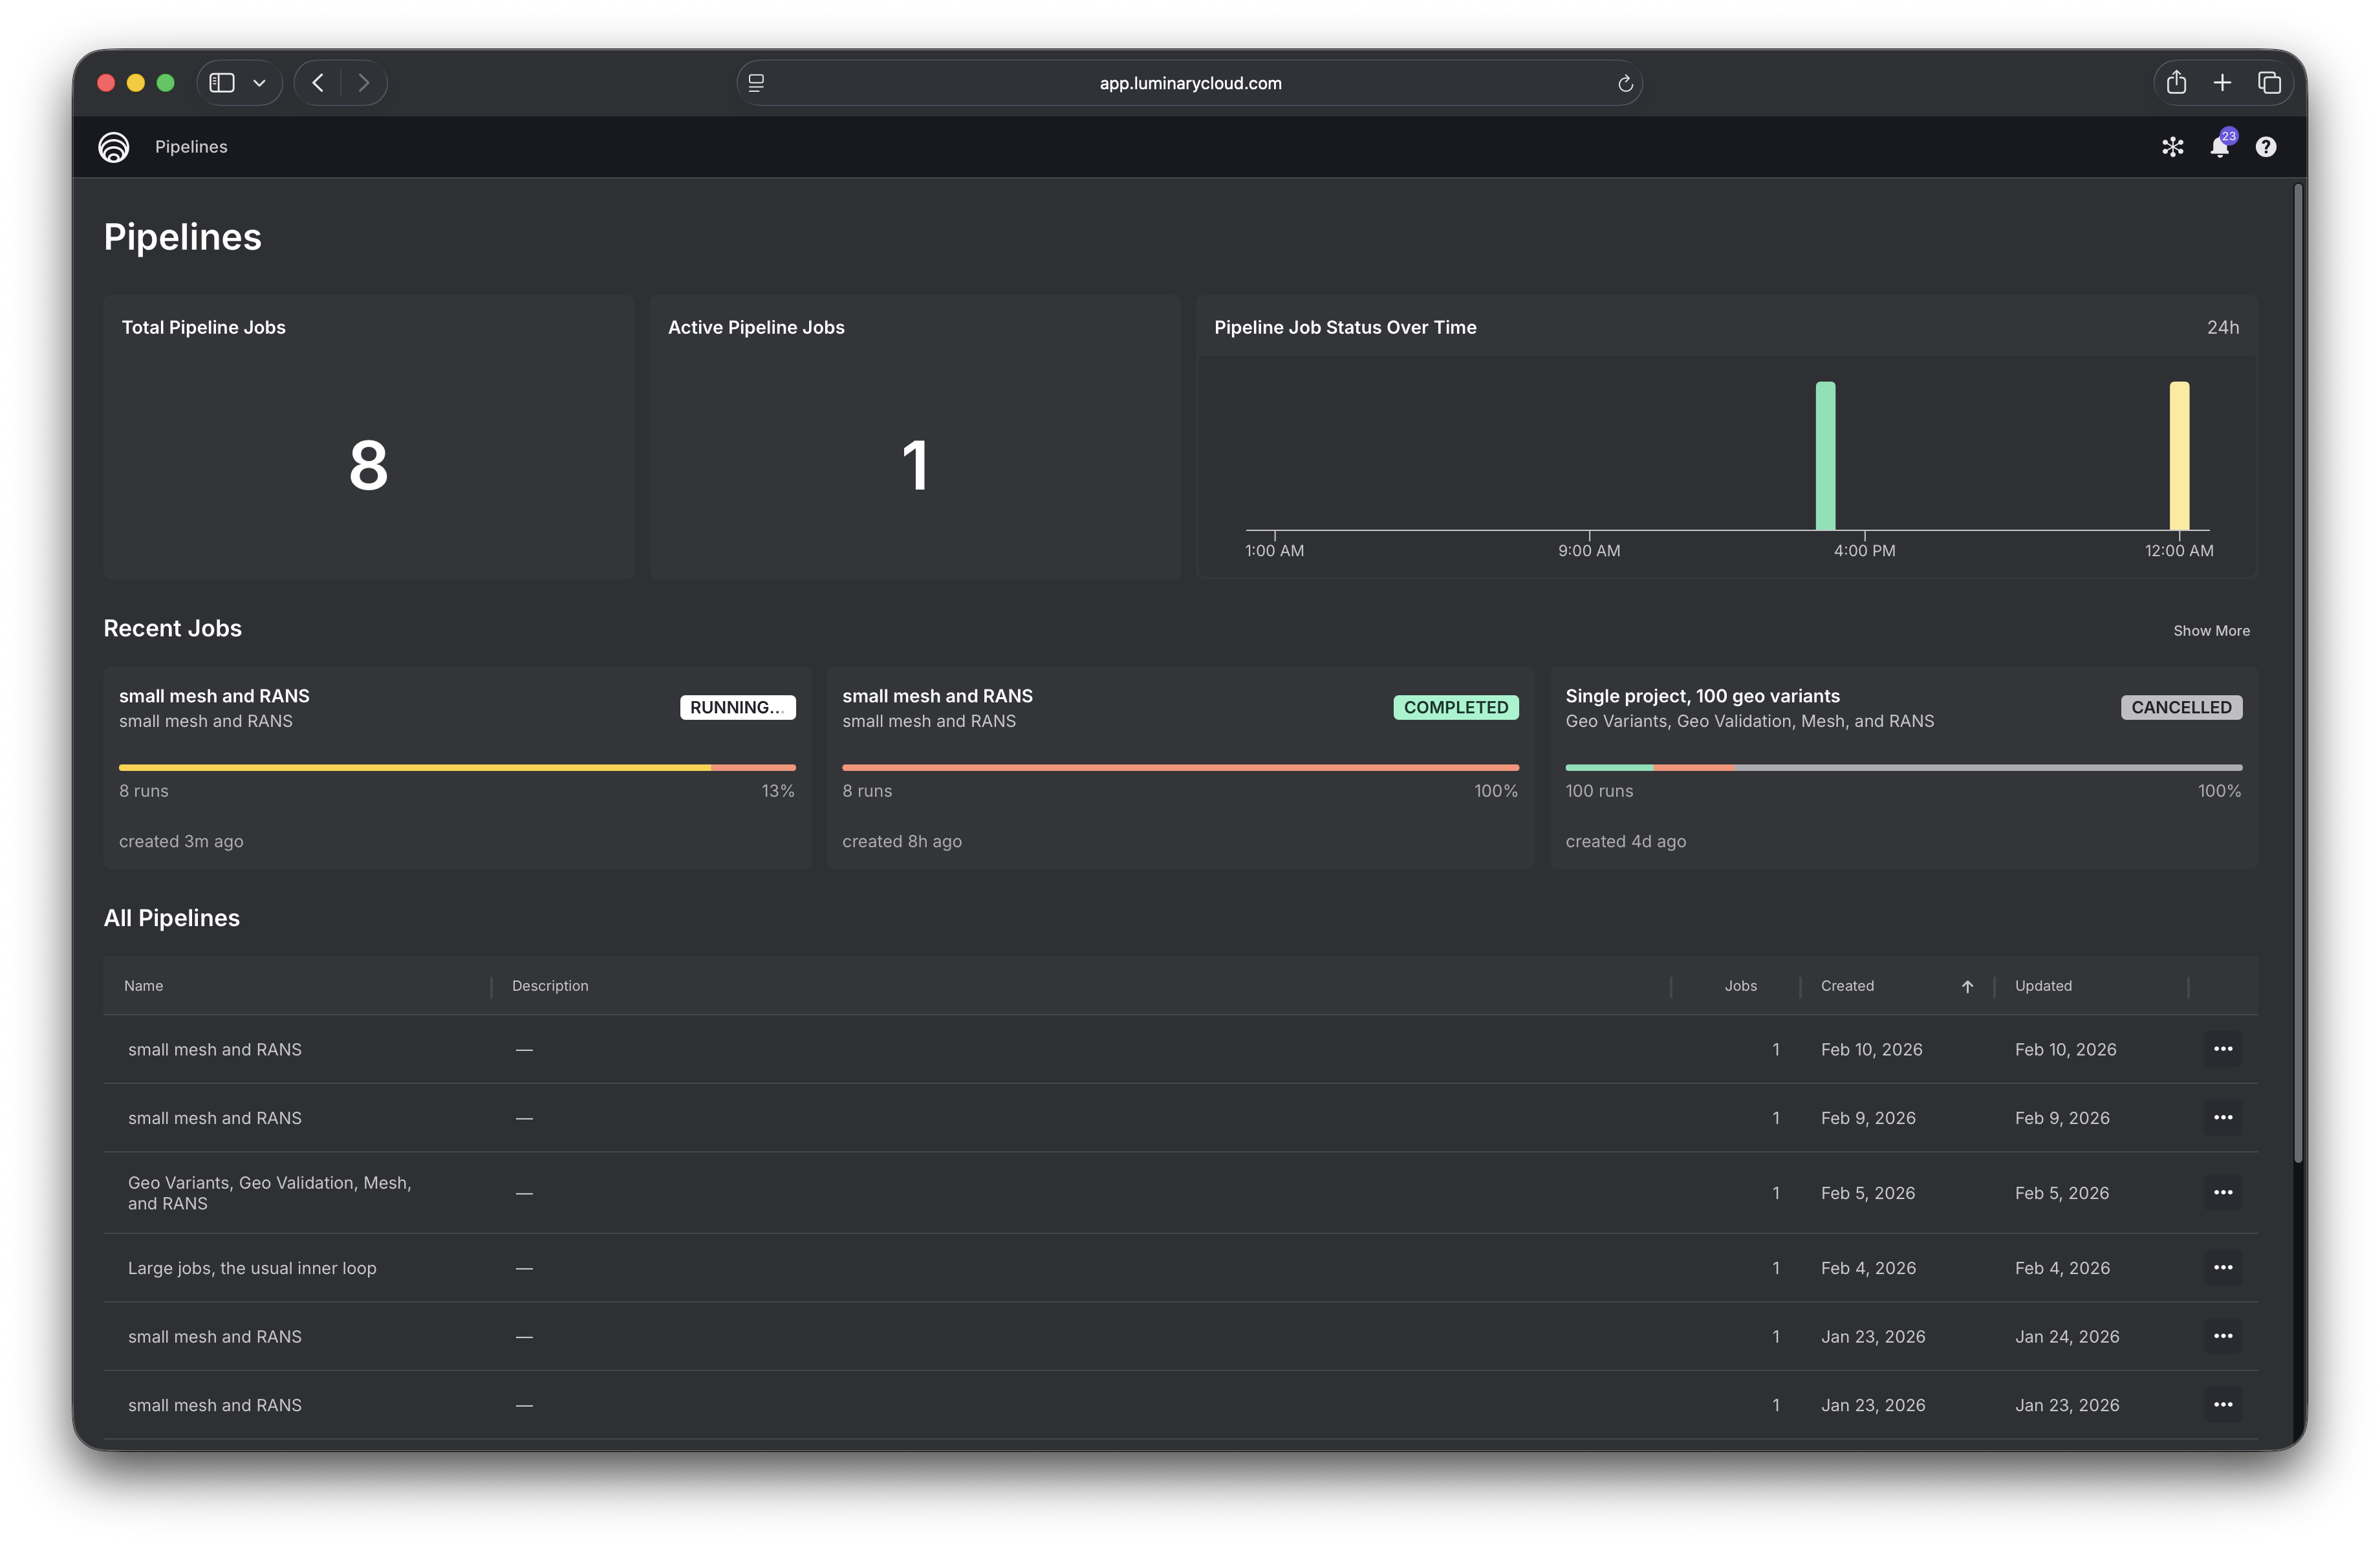
Dashboard
The Pipelines dashboard gives you an overview of your recent jobs and all your pipelines.
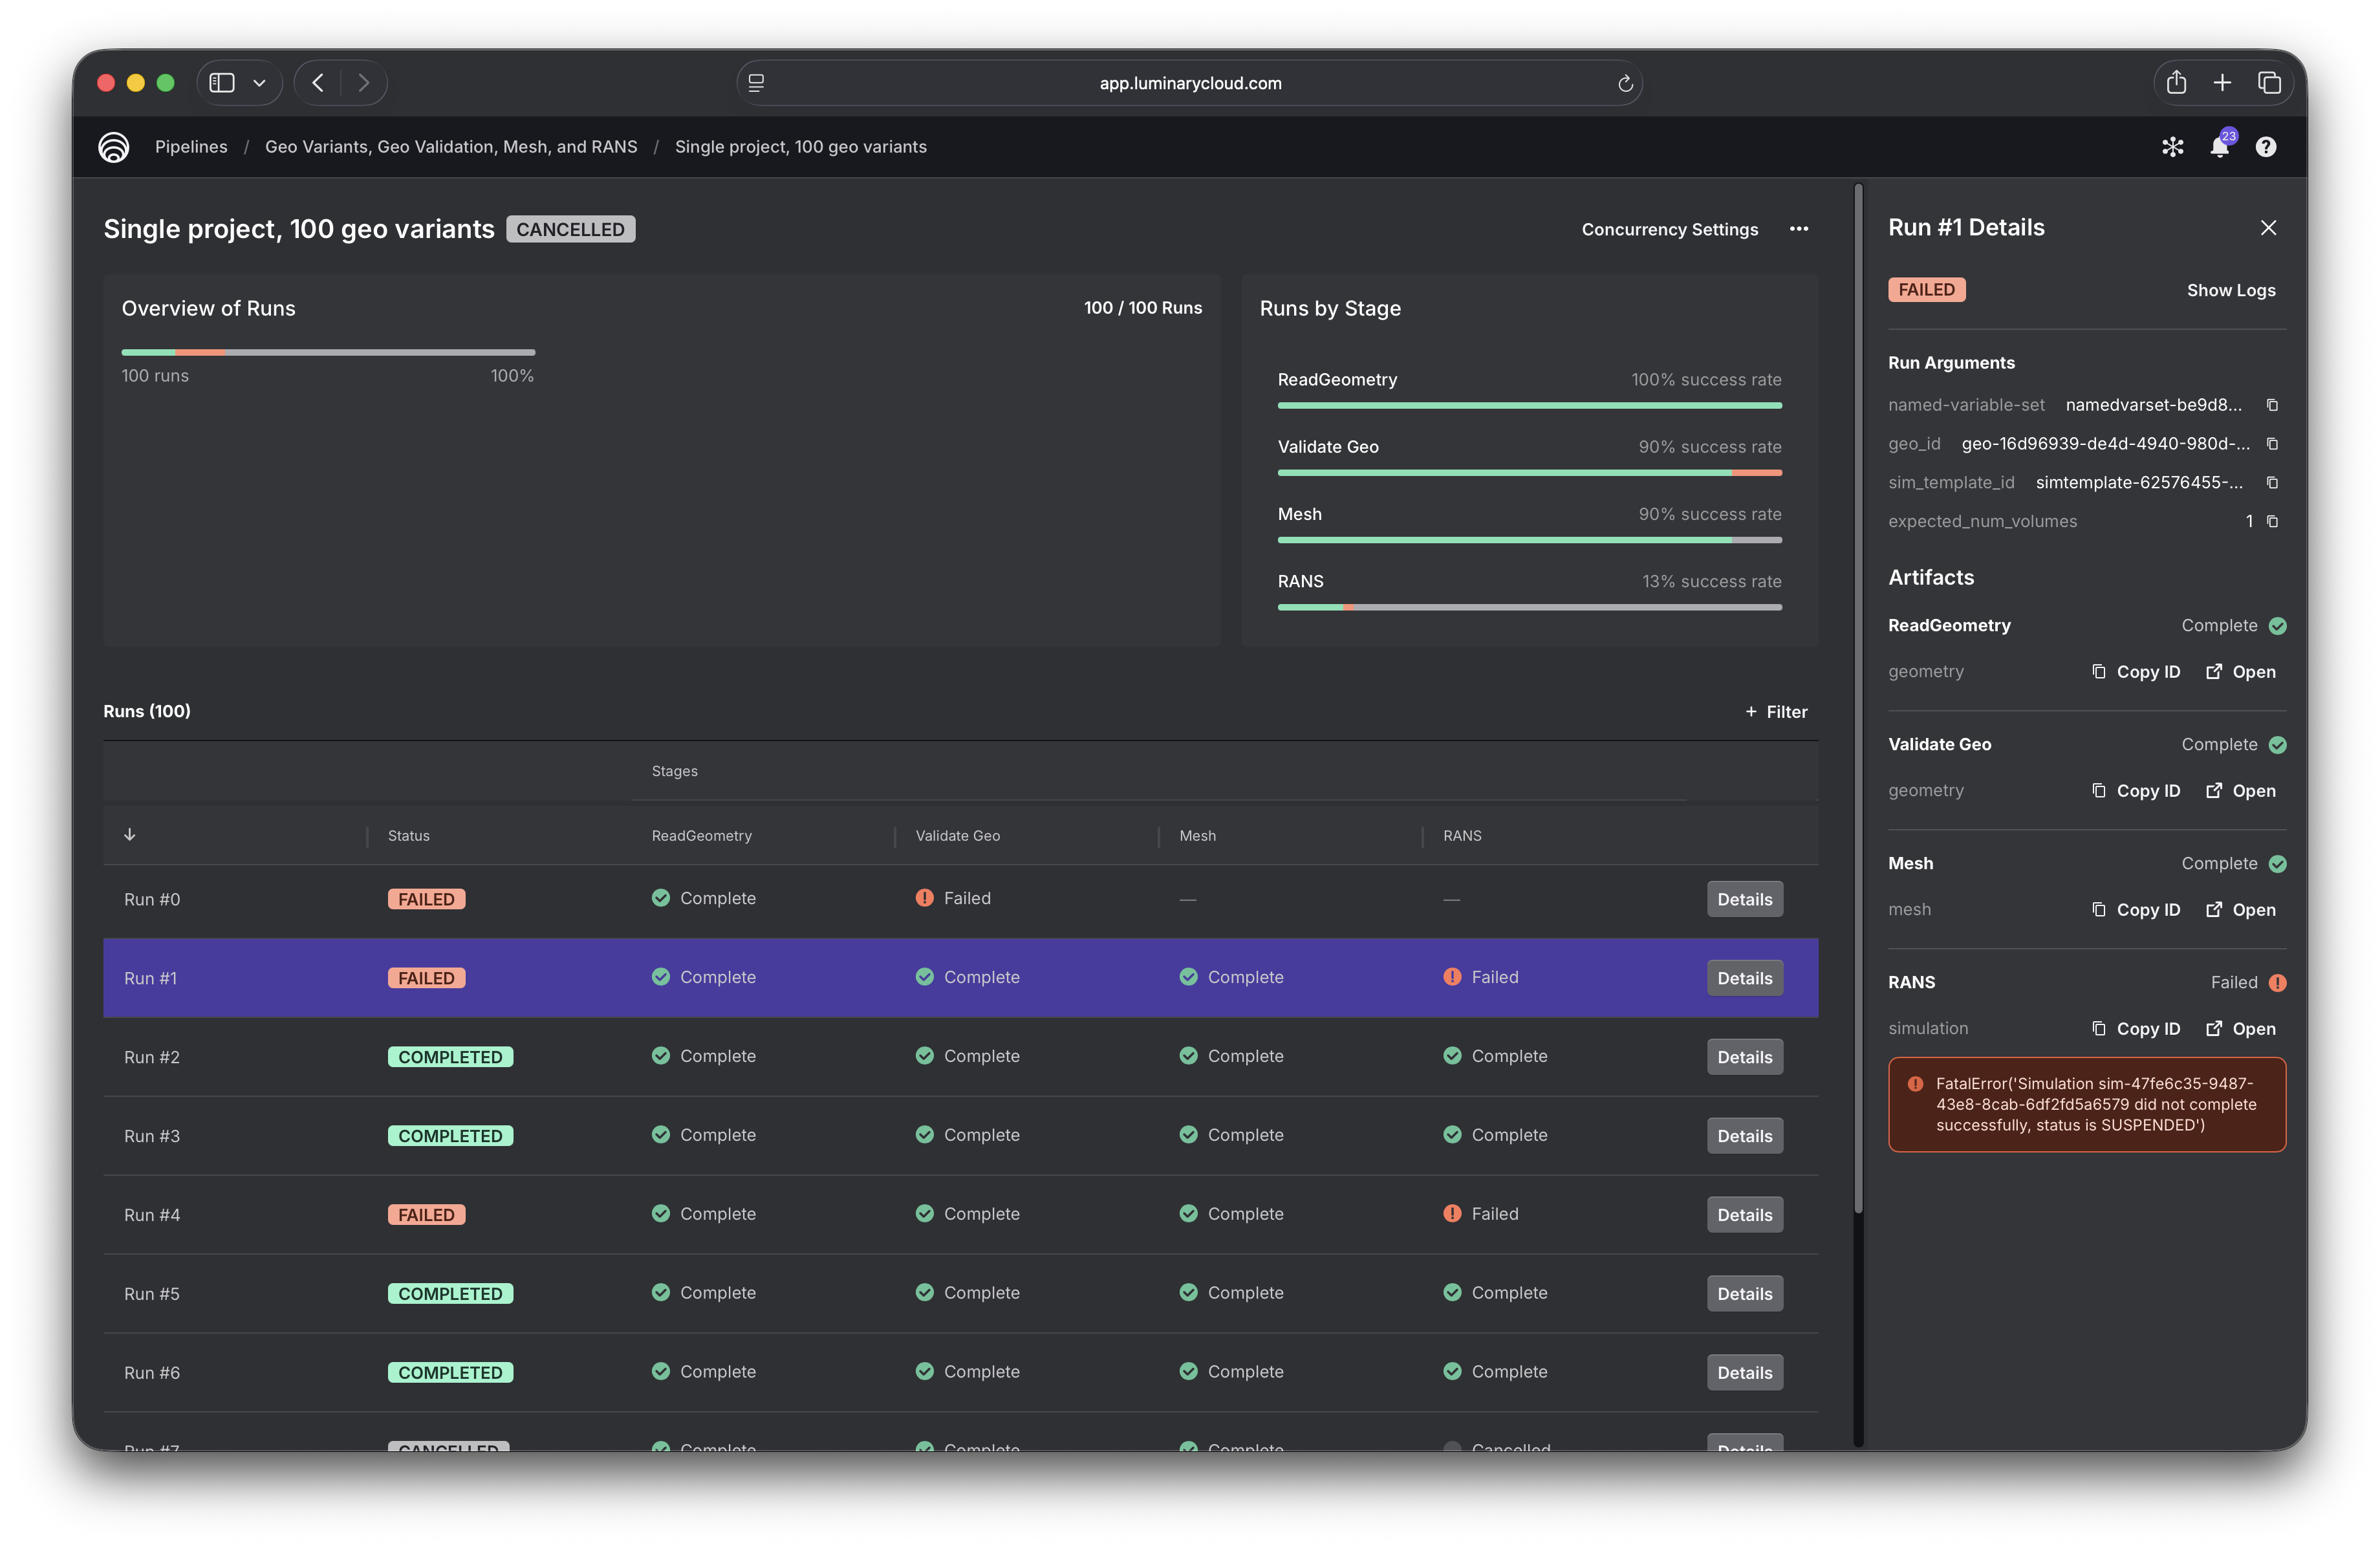
Job and run details
Clicking into a job, you get a full breakdown of its execution status. The runs table shows the status of every task for every run, and rows can be filtered by task status, making it easy to identify failures for any given stage. Clicking a run opens a details panel that shows the run’s arguments, links to all generated artifacts, and displays error messages for any failed tasks.
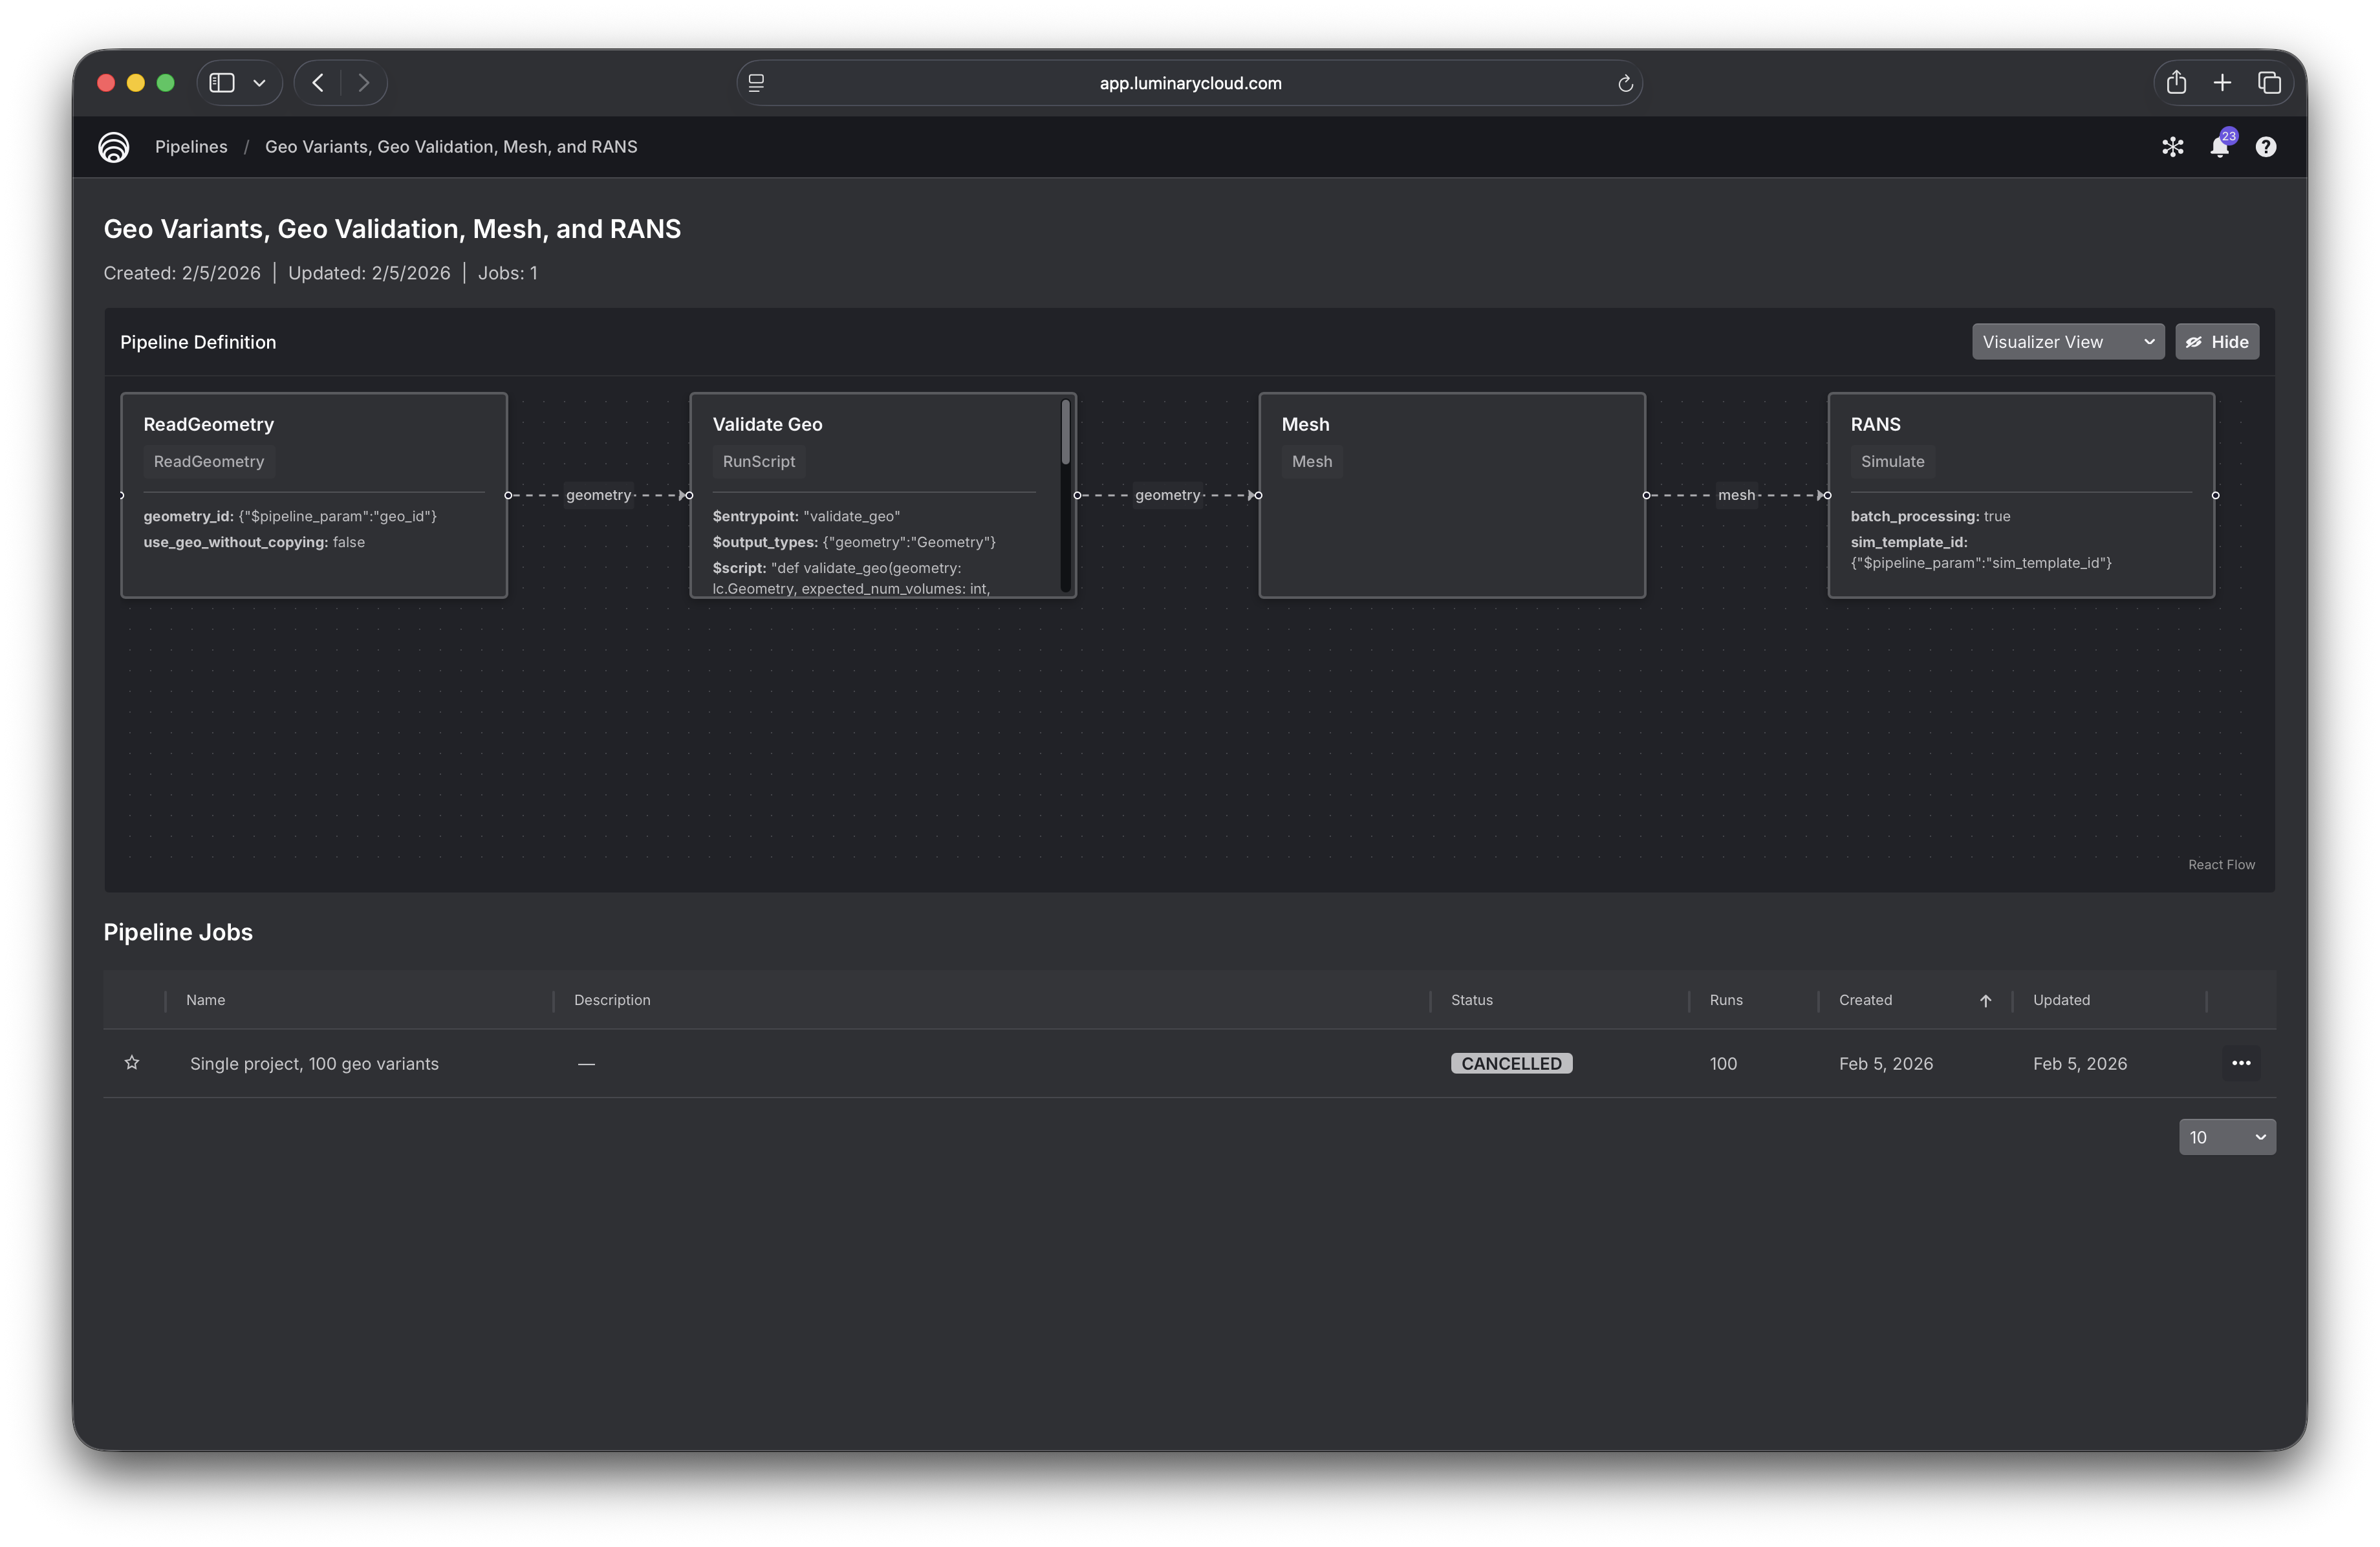
Pipeline structure
Clicking a pipeline gives you a graphical view of its structure, along with a table of all jobs that have been created from it.
Builder Interface
Here’s a complete example showing how to build and invoke a Pipeline. It includes many of the features of the builder interface, and represents a typical workflow.
import luminarycloud as lc

# We'll build a Pipeline that does the following:
#  1. Creates a geometry variant by applying a named variable set (NVS) to a parametric baseline geo
#  2. Runs some basic validations on the generated geometry and stops the run early if it fails
#  3. Produces a minimal mesh from the geometry
#  4. Runs a simulation on the geometry
#
# Then we'll create a PipelineJob that runs that pipeline with 100 variants.
#
# ASSUMPTIONS:
#  1. You're already created a Project and uploaded a parametric geometry.
#  2. You've set each geometry parameter you want to vary equal to a named variable.
#  3. You're created 100 NVS's, each with a unique set of values for those geo parameters.
#  4. You've created a SimulationTemplate in the Project

# Here are the identifiers for the resources we've set up ahead of time
base_geo_id = 'geo-12345678-1234-1234-1234-1234567890ab'
sim_template_id = 'simtemplate-12345678-1234-1234-1234-1234567890ab'
nvs_ids = [...] # list of 100 named variable set IDs

# We will parameterize our pipeline on geometry ID, sim template ID, and the number of volumes we
# expect to exist in the generated geometry.
pp_geo_id = lc.pipelines.StringPipelineParameter("geo_id")
pp_sim_template_id = lc.pipelines.StringPipelineParameter("sim_template_id")
pp_expected_num_volumes = lc.pipelines.IntPipelineParameter("expected_num_volumes")

# Now we'll build our pipeline by defining its stages
create_geo = lc.pipelines.CreateGeometry(base_geometry_id=pp_geo_id)

@lc.pipelines.stage(
    inputs={"geometry": create_geo.outputs.geometry},
    outputs={"geometry": lc.pipelines.PipelineOutputGeometry},
    params={"expected_num_volumes": pp_expected_num_volumes},
)
def validate_geo(geometry: lc.Geometry, expected_num_volumes: int):
    _, volumes = geometry.list_entities()
    if len(volumes) != expected_num_volumes:
        raise lc.pipelines.StopRun(
            f"Geometry {geometry.id} has {len(volumes)} volumes, expected {expected_num_volumes}"
        )
    return {"geometry": geometry}

create_mesh = lc.pipelines.CreateMesh(geometry=validate_geo.outputs.geometry)

create_sim = lc.pipelines.CreateSimulation(
    sim_template_id=pp_sim_template_id,
    mesh=create_mesh.outputs.mesh,
)

pipeline = lc.pipelines.create_pipeline(
    name="Geo variant -> mesh -> RANS",
    stages=[create_geo, validate_geo, create_mesh, create_sim],
)

print("Created pipeline:", pipeline.id)

# We can then invoke the pipeline to create a pipeline job. All pipeline parameters used in the
# pipeline must be present in our PipelineArgs table. We can optionally include a named variable set
# column, too, as named variable set is always an implicit parameter of all pipelines.

arg_cols = [
    pp_geo_id,
    pp_sim_template_id,
    pp_expected_num_volumes,
    lc.pipelines.PP_NAMED_VARIABLE_SET_ID, # this is the special const for an NVS column
]

# For simplicity of this example, every row will only differ by NVS ID.
arg_rows = [
    [base_geo_id, sim_template_id, 1, nvs_id] for nvs_id in nvs_ids
]

args = lc.pipelines.PipelineArgs(arg_cols, arg_rows)

# Now we can invoke the pipeline, i.e. create a PipelineJob
pipeline_job = pipeline.invoke(args, name="100 geo variants, fixed flow conditions")

print("Created pipeline job:", pipeline_job.id)
Full Example Tutorial
For a complete example that’s runnable end-to-end and includes scripted setup of the requisite project, geometry, simulation template, and named variable sets, see the in-app Pipelines Tutorial Notebook. It is also available in our Github tutorials repo, .